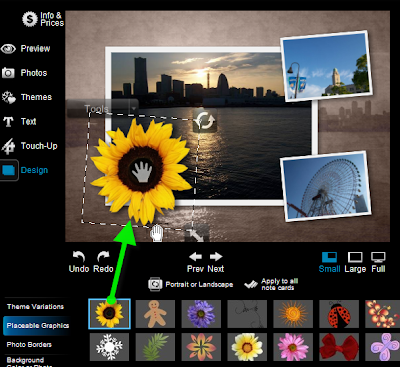
Adding a placeable graphic in RocketLife. Notice how the flower also includes a drop shadow to add depth.
TipEach theme in RocketLife has its own set of placeable graphics. Here's how to browse them quickly:
- Click the Design tab.
- Click the Placeable Graphics tab (below the Design tab).
- Click a theme button. The grid of graphics at the bottom of the screen will update:

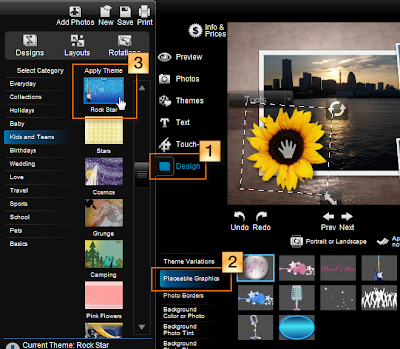
Browse placeable graphics by clicking the Design tab (1), and then the Placeable Graphics tab (2), followed by a theme button (3). Click a graphic in the grid to add it to your layout. (Click photo to enlarge.)
Read on to learn how to add your own graphics to a RocketLife project.
Make It Your Own
To make your photo creations even more personal, you can load your own placeable graphics into RocketLife, using the PNG format.PNG (Portable Network Graphics) is an increasingly popular graphics file format. Unlike JPEG, it supports transparency. And unlike GIF — which does support transparency — PNG offers more colors. (Those cheesy little twitching icons on the Web are usually GIFs.)
There are zillions of public-domain PNG images online. Here's a little penguin we found at WPClipart.com:

To add your own PNGs to RocketLife, you can click the Add Photos button or — this is very cool — drag them directly onto the layout from your computer desktop:
TipWhen you drag an image directly onto the layout from the desktop, the existing photos stay in place. Normally, RocketLife will rearrange the existing images to make room for the new one, but if you're adding a graphic rather than a photo, you may not want them to move. If you want to add a number of PNGs at once, though, the Add Photos button is easier.
Here we've dragged three penguins onto our layout and resized one of them:
TipIf you look closely at the penguins, you'll notice that RocketLife automatically added a drop shadow to them. Here's how to remove the shadow:
- Select the image.
- Click the Touch-Up tab.
- Select the Photo Border category.
- Select the No Border No Shadow effect.
We'll share more placeable-graphics tips in a future tutorial. Until then, consider this: Transparent PNGs are good for far more than cute little animals. They're also a great way to add logos and custom frames. More soon!


Look closely at the last two images and you'll see another cool application for placeable graphics: The penguin at the top is covering an unsightly lamppost in the photo. Covering parts of a photo is more artistic than cropping and faster than cloning out the unwanted part in Photoshop.
ReplyDelete