Learn how the new Print Panel in RocketLife-powered software makes it easy to print your photo projects at home. We show how to resize images to fit the page and even optimize the layout to save paper and simplify cutting. (Click the Full Screen button to watch the video in HD.)
This demo shows a version of our software with print-at-home capability. However, you can create similar gridded layouts in all RocketLife-powered software. Just select the Design tools and then click the Photo Layouts tab.
What would you like to print? Let us know in the comments below.
Showing posts with label tips. Show all posts
Showing posts with label tips. Show all posts
Monday, March 12, 2012
Friday, February 17, 2012
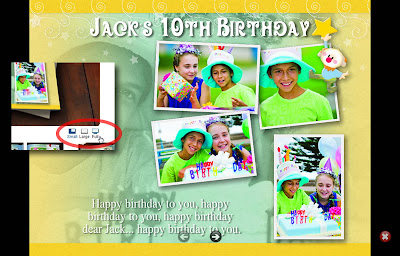
Make Your Own Monthly Photo Calendar
Your calendar occupies a prime position on your wall, so why not make it truly personal? This video shows how to create a great-looking calendar from your photos in less than two minutes, using RocketLife-powered software. You’ll learn how to add photos, choose a theme and starting month, and customize the calendar grid itself to complement your photos. (Click the Full Screen button to watch in HD.)
These tips apply to all of our calendar projects, including ship-to-home, print-at-home, and pick-up-at-store versions.
What’s on your calendar? Let us know in the comments below.
These tips apply to all of our calendar projects, including ship-to-home, print-at-home, and pick-up-at-store versions.
What’s on your calendar? Let us know in the comments below.
Monday, January 9, 2012
Add Style with the Monochrome Airbrush
RocketLife software offers four airbrushes to make your photo creations even more creative. This video shows how to add a beautiful black-and-white effect with the Monochrome brush. You’ll also learn the secret key command to clean up edges and apply highlights. (Click the Full Screen button to watch in HD.)
Try the other airbrushes, too. Sepiatone adds an antique brown. Blur lets you soften distracting objects in the background. Rub Through erases parts of a photo to reveal another photo underneath.
What techniques have you discovered? Let us know in the comments below.
Try the other airbrushes, too. Sepiatone adds an antique brown. Blur lets you soften distracting objects in the background. Rub Through erases parts of a photo to reveal another photo underneath.
What techniques have you discovered? Let us know in the comments below.
Wednesday, June 1, 2011
“I had so much fun making the book!”
Recently, we asked people who made RocketLife photo books for their loved ones to describe the experience: How did it feel to make the book, and how did the recipient react?
The answers were especially poignant because the makers were mostly women with husbands and sons deployed abroad. Through the USO Photo Book program, families such as theirs can create and send a 5x7 soft cover photo book to any overseas US military address at no cost. RocketLife prints the books and the USO pays for shipping.

Our 5x7 soft cover photo books are big enough to hold 60 photos, yet small enough to fit a soldier's cargo pocket. (Click to enlarge.)
We published several comments on our Facebook page about the emotional effect of making and receiving photo gifts. Here are two that speak to the creative side.
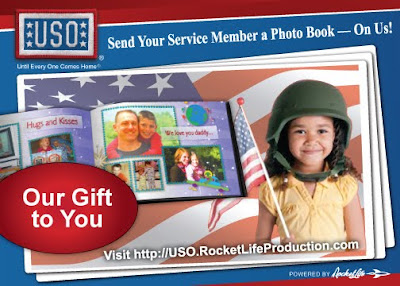
Learn more about the USO Photo Book program — and start your book — at USO.RocketLifeProduction.com.
The answers were especially poignant because the makers were mostly women with husbands and sons deployed abroad. Through the USO Photo Book program, families such as theirs can create and send a 5x7 soft cover photo book to any overseas US military address at no cost. RocketLife prints the books and the USO pays for shipping.

Our 5x7 soft cover photo books are big enough to hold 60 photos, yet small enough to fit a soldier's cargo pocket. (Click to enlarge.)
We published several comments on our Facebook page about the emotional effect of making and receiving photo gifts. Here are two that speak to the creative side.
❝This offer was amazing! Eric received the book fast and enjoys it regularly, I'm told. I had so much fun making the book for him and playing with the different features! It's making this 12-month deployment to Iraq a little easier.
I loved being able to use a picture from my gallery for the background on a page for other pictures to lay over top of. These abilities make my album look like a high-quality professional job I paid big bucks for. —Kat Malette
* * *
❝I was so excited that I would be able to send something like this to my deployed soldier. While I was making the book I felt so proud of him and missed him terribly, but going through all our pictures just reminded me how lucky I am to have him...so to be happy and not sad! He absolutely loved when the book came in the mail. He was so surprised at the quality of it and he knew that I had made it, so it is very special to him.
I found the software very easy to use. You could get so creative with it. I liked the feature where you could put a picture as your background. I took pictures of all the letters we've written back and forth to each other, so every page of the book has wording in his handwriting. I never would have thought to do that unless I had the RocketLife software! —Amy Schuster

Learn more about the USO Photo Book program — and start your book — at USO.RocketLifeProduction.com.
Friday, May 20, 2011
Tips for Perfect Projects
We want you to be delighted with your RocketLife photo creations. Here are six tips from our customer support staff on making your projects look their best — plus two bonus creativity tips.
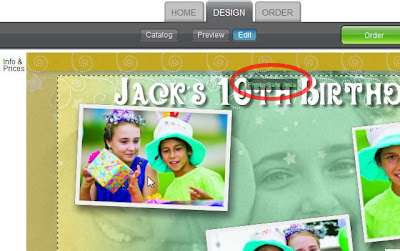
Proofread every page of your project in full-screen mode before ordering. (Click the "Full" button below the main image.)
The "Full" button (inset) zooms your layout to the full size of your screen so you can inspect it in detail. (Click to enlarge.)
If you're unsure about spelling, type your text into a word processor and spell-check it there. Then paste the corrected text into the program.
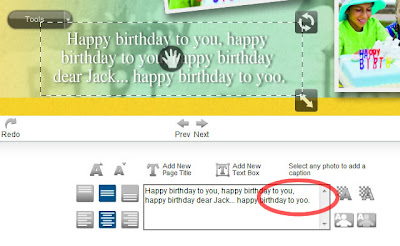
Yoo-hoo! Avoid boo-boos. Use a word processor to polish your text to perfection, then paste it into RocketLife's text-entry area. (Click to enlarge.)
Pay attention to the Photo Safe Area at the edge of the layout. Items that cross into that area may be cut off during printing.
The Photo Safe Area border appears as you drag items toward the edge of the layout. Keep them inside this border so they won't be cropped when your project is printed. (Click to enlarge.)
Tip Sometimes you may want to drag an object all the way to the edge of the layout — or even beyond — to create a dramatic cropping effect. To drag an object to the edge, hold down the Shift key on your keyboard while dragging. Hold down the Control key instead to drag it even farther. Here's an example.
Make sure your images are big enough to print clearly. If an image is too small, the program displays a Low Resolution Warning, along with directions for fixing the problem image.
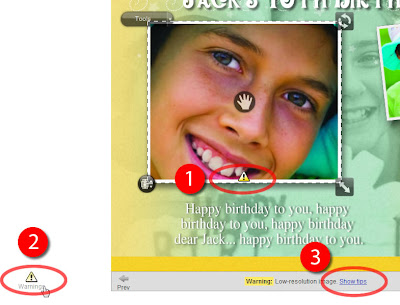
The Low Resolution Warning symbol on an image (1) tells you the image is too small to print clearly. Clicking the symbol at left (2) reveals tips for fixing the image (3). (Click to enlarge.)
Consider brightening dark photos in your layouts. (The Brightness tool is in the Touch-Up tab.) Many computer screens are unnaturally bright, causing photos to print darker than you'd expect.

The Brightness tool can add punch to murky photos. (Click to enlarge.)
Tip You can use the Brightness tool creatively, too. Try brightening a background photo to fade it out, or darkening a placeable graphic to turn it into a silhouette.
The 3D preview shows you exactly how your finished project will look. Except in one case: It doesn't update to show different book covers as you select them. Instead, refer to the thumbnail images to see what the selected cover style will look like.
With hundreds of cover styles available, it was simplest to show just the main one in the 3D preview. Use the thumbnail images at bottom to see what the selected cover style will look like. (Click to enlarge.)
Feel free to add your own tips in the comments section below. Remember, our customer support staff is available 9–6 weekdays (Eastern US time) at 866-934-9514 to answer detailed questions and help with specific computer issues. For simpler questions, visit our Facebook page.
1. Full-Screen Is Your Friend
Proofread every page of your project in full-screen mode before ordering. (Click the "Full" button below the main image.)

The "Full" button (inset) zooms your layout to the full size of your screen so you can inspect it in detail. (Click to enlarge.)
2. Double-Check Your Text.
If you're unsure about spelling, type your text into a word processor and spell-check it there. Then paste the corrected text into the program.

Yoo-hoo! Avoid boo-boos. Use a word processor to polish your text to perfection, then paste it into RocketLife's text-entry area. (Click to enlarge.)
3. Stay Safe
Pay attention to the Photo Safe Area at the edge of the layout. Items that cross into that area may be cut off during printing.

The Photo Safe Area border appears as you drag items toward the edge of the layout. Keep them inside this border so they won't be cropped when your project is printed. (Click to enlarge.)
Tip Sometimes you may want to drag an object all the way to the edge of the layout — or even beyond — to create a dramatic cropping effect. To drag an object to the edge, hold down the Shift key on your keyboard while dragging. Hold down the Control key instead to drag it even farther. Here's an example.
4. Watch for Warnings
Make sure your images are big enough to print clearly. If an image is too small, the program displays a Low Resolution Warning, along with directions for fixing the problem image.

The Low Resolution Warning symbol on an image (1) tells you the image is too small to print clearly. Clicking the symbol at left (2) reveals tips for fixing the image (3). (Click to enlarge.)
5. Lighten Up
Consider brightening dark photos in your layouts. (The Brightness tool is in the Touch-Up tab.) Many computer screens are unnaturally bright, causing photos to print darker than you'd expect.

The Brightness tool can add punch to murky photos. (Click to enlarge.)
Tip You can use the Brightness tool creatively, too. Try brightening a background photo to fade it out, or darkening a placeable graphic to turn it into a silhouette.
6. Choose a Book by Its (Thumbnail) Cover
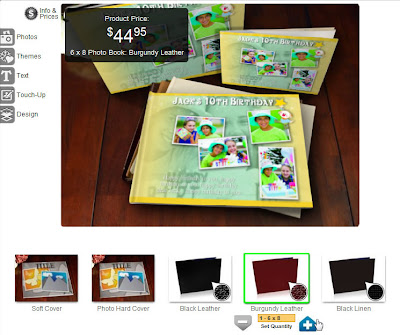
The 3D preview shows you exactly how your finished project will look. Except in one case: It doesn't update to show different book covers as you select them. Instead, refer to the thumbnail images to see what the selected cover style will look like.

With hundreds of cover styles available, it was simplest to show just the main one in the 3D preview. Use the thumbnail images at bottom to see what the selected cover style will look like. (Click to enlarge.)
Feel free to add your own tips in the comments section below. Remember, our customer support staff is available 9–6 weekdays (Eastern US time) at 866-934-9514 to answer detailed questions and help with specific computer issues. For simpler questions, visit our Facebook page.
Friday, April 8, 2011
Fast, Fast, Fast
Uploaded many photos lately? As camera makers crank up the megapixels (the number of dots per image), each photo gobbles more megabytes of memory. The more "mega" the photo, the longer it takes to upload.
Ironically, you often don't need that extra resolution for printing. When you upload a huge photo to a typical site, the software has to squash it down again to make it fit the page.
At RocketLife, we took a different approach. RocketLife works directly with the photos on your computer. Your initial layout appears within seconds. You can drag photos around, apply effects, try new themes, and enjoy all kinds of creative experimentation instantly. Only when you're done designing do you upload your project for printing — at just the right size.
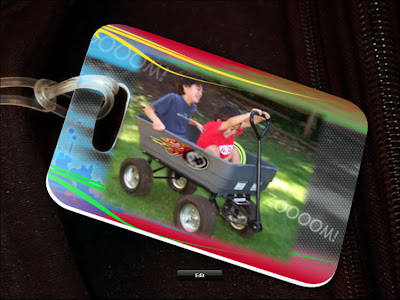
Fast, fast, fast. This luggage tag uses the Cars theme, a placeable graphic, and two text boxes with transparency. (Click to enlarge.)
Of course, high-megapixel photos do have advantages. They give you more room for cropping, for example. When you're photographing your child on the far side of the soccer field and want to fill the frame, it's easier to take a high-megapixel photo and crop it later than wrestle with a huge telephoto lens. Taking high-res photos also makes sense for archival purposes. The extra data will likely be useful with future printing and display technologies.
When you're in a creative mood, though, speed matters. That's also why we don't require passwords or logins. Simply add your photos and start creating. (See How To Make a Photo Book in 3 Minutes with RocketLife.)
Don't wait to get creative!
Tuesday, October 26, 2010
How To Mix & Match Graphics in RocketLife
Each theme in RocketLife includes a related set of Placeable Graphics. The Halloween theme, for example, offers nine: a bat, a ghost, two moons, two spiderwebs, a black cat, some pumpkins, and a spider. However, we don't restrict you to one set; you can easily grab and use any graphic in the program. (There are currently more than 800.)
In case you missed our last tutorial, Placeable Graphics are like stickers without the goo: You can drop these images on your layout and smoothly rotate, resize, and even tint or crop them.
This calendar page features two placeable graphics — a moon and a spider. (The bats are part of the Halloween theme itself.)
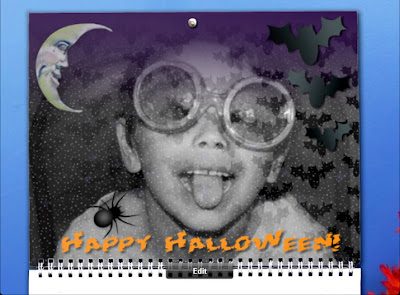
This calendar page mixes Placeable Graphics from two themes. Also notice how RocketLife automatically blended the main photo into the theme for an extra spooky effect. (Click to enlarge.)
The spider image came from the Halloween theme:
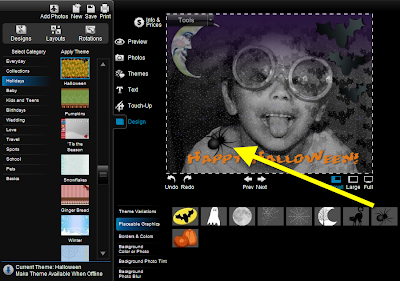
To add the spider graphic to our layout, we clicked the Design tab, then the Placeable Graphics tab, and then the spider image. (Click to enlarge.)
The moon image came, surprisingly, from the Garden Surprise theme:
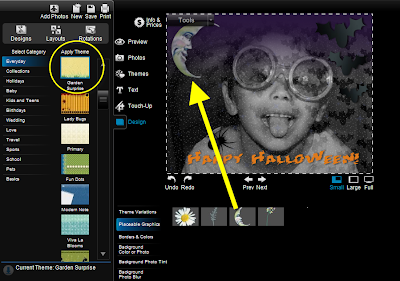
Selecting a new theme from the lefthand column in Design mode brings up its set of Placeable Graphics. We found the perfect moon in the Garden Surprise theme. (Click to enlarge.)
Tip To add even more spooky atmosphere, we then selected the moon on the layout and made it slightly transparent, simulating fog. You'll find transparency controls in the Touch-Up tab.
Placeable graphics are especially good for scrapbooking, as RocketLife expert Kim Guymon demonstrates in this video, Digital Scrapbooking with RocketLife. And you can even add your own.
Friday, October 8, 2010
Digital Scrapbooking with RocketLife
RocketLife's layout tools are remarkably flexible. In this video, Kim Guymon of ScrapBiz and PhotoBooks{etc} shows how to use the program (version 1.0!) for scrapbooking.
Starting with a plain white theme, she loads a custom background image, a couple of photos, and some partially transparent PNG graphics. (For more on using PNGs to make your own placeable graphic "stickers," see Cool Tip: Adding Your Own Graphics and Logos in RocketLife.)
Using RocketLife's cropping, resizing, layering, and text tools, Kim quickly creates a cheerful scrapbook page with a unique personality.
Tuesday, September 14, 2010
How To Make a Photo Book in 3 Minutes with RocketLife
RocketLife Creative Director Gina Barbosa shows how to create and customize your own photo book with RocketLife software. From start to finish, it actually takes less than three minutes. Of course, once you go back and start customizing, you can happily spend hours!
What topics would you like to see us cover next? Please leave a comment.
What topics would you like to see us cover next? Please leave a comment.
Thursday, July 1, 2010
Cool Tip: Dare To Theme
The RocketLife software offers more than 1,600 graphic themes to enhance your photo layouts. That may sound like too much of a good thing, but we've organized the themes into three nested categories, so trying new looks is easy.
At the top level are categories such as Sports and Pets. These contain subcategories such as Tennis and Cats. And finally, each subcategory contains a set of variations, complete with designer-selected colors and placeable graphics.
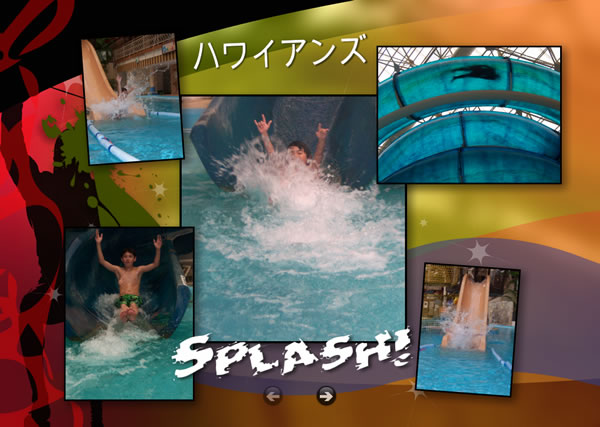
Can you guess which theme we used here? It's not the obvious choice. (Click to enlarge.)
To get started exploring themes, click the Themes tab, select a category, and then click a thumbnail image in the Apply Theme column:
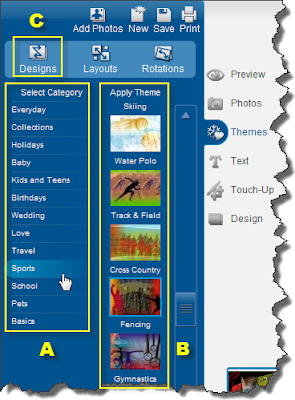
The Themes tab shows the top-level categories (A). Click a thumbnail image (B) to apply one of the themes to your layout. Click the Designs button (C) to step through variations. (Click to enlarge.)
Tip: Clicking the Design tab lets you see all theme variations at once:

Each theme offers numerous variations, shown in the thumbnail images at the bottom of the page. The variations with the head-and-shoulders silhouette automatically blend the biggest photo into the background. (Click to enlarge.)
Here's the cool tip: Don't feel restricted by the theme category names. You can get some really interesting results by thinking outside the box. For the Japanese water park photos above, we initially tried themes such as Swimming and Water Polo, but ended up liking the contrasting colors in the Fencing theme more.
There was just one snag: The left edge of this particular theme variation had a silhouette of a swordsman. So we covered it with a placeable graphic and used the photo tint feature in the Touch-Up tab to match one of the background colors:

Partially covering the sword-fighter silhouette with a placeable graphic transformed it into a background texture.
Here's the final layout again:
With some creative masking, the Fencing theme worked well for this water park layout. (Click to enlarge.)
For more creative ideas for placeable graphics, see these Cool Tips:
Friday, June 18, 2010
Cool Tip: The Daddy of All Photo Frames
Kate in RocketLife Support shared this clever collage she made for Father's Day. (Click the image to zoom in.) Notice there are just six components:

Notice how the "dad" graphic neatly frames the baby pictures. (Click to enlarge.)
There are two ways to convert a photo to a background image in RocketLife. To start, select the photo and then click the Tools menu. (That's the button at the top left corner of the photo.) Next, choose either Copy to Background or Make Photo Full Page. The Copy command blends the photo into the texture of the theme. The Full Page command enlarges the photo to fill the page. In this case, we want to use Full Page:
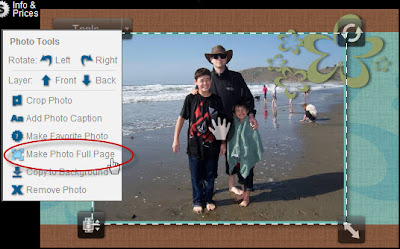
Instantly enlarge a photo to fill the page by clicking the Make Photo Full Page command in the Tools menu. (Click to enlarge.)
Tip Notice how Kate's background photo is faded slightly to emphasize the text and foreground images. To get a similar effect, choose the Plain White theme (in the Basics category), select the Touch-Up tab, and then set Transparency to about 30. That will let part of the white background show through, fading the image.
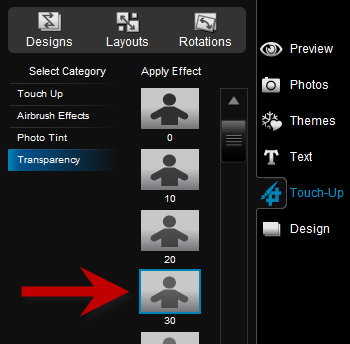
The Transparency effect makes images fade into the background, helping to emphasize other elements on the page.
As you can see, the Touch-Up tools aren't just for fixing problem photos. You can also use them creatively. We'll explore that idea further in future tutorials. To read more tips for using placeable graphics, see Adding Your Own Graphics and Logos in RocketLife.
What clever techniques have you discovered, Daddy-O? Please leave a comment!
- The background photo
- The text, "Happy First Father's Day 2010"
- Three small baby photos
- The large "dad" placeable graphic from the Father's Day theme

Notice how the "dad" graphic neatly frames the baby pictures. (Click to enlarge.)
There are two ways to convert a photo to a background image in RocketLife. To start, select the photo and then click the Tools menu. (That's the button at the top left corner of the photo.) Next, choose either Copy to Background or Make Photo Full Page. The Copy command blends the photo into the texture of the theme. The Full Page command enlarges the photo to fill the page. In this case, we want to use Full Page:

Instantly enlarge a photo to fill the page by clicking the Make Photo Full Page command in the Tools menu. (Click to enlarge.)
Tip Notice how Kate's background photo is faded slightly to emphasize the text and foreground images. To get a similar effect, choose the Plain White theme (in the Basics category), select the Touch-Up tab, and then set Transparency to about 30. That will let part of the white background show through, fading the image.
The Transparency effect makes images fade into the background, helping to emphasize other elements on the page.
As you can see, the Touch-Up tools aren't just for fixing problem photos. You can also use them creatively. We'll explore that idea further in future tutorials. To read more tips for using placeable graphics, see Adding Your Own Graphics and Logos in RocketLife.
What clever techniques have you discovered, Daddy-O? Please leave a comment!
Wednesday, June 2, 2010
Cool Tip: Adding Your Own Graphics and Logos in RocketLife
RocketLife photo software comes with more than 800 placeable graphics — images you can add to your layout to add depth and interest. We create these images with transparent backgrounds to help them blend into the composition. Notice the sunflower below, inserted from the collection of placeable graphics at the bottom of the screen. Thanks to the transparent background, you can see between the petals. (Click image to enlarge.)
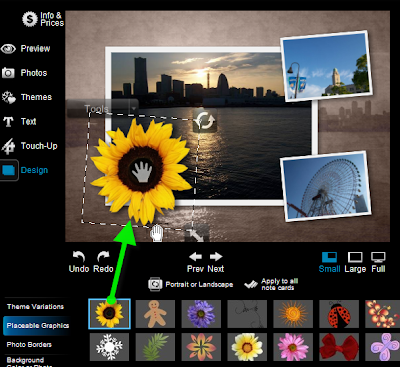
Adding a placeable graphic in RocketLife. Notice how the flower also includes a drop shadow to add depth.
TipEach theme in RocketLife has its own set of placeable graphics. Here's how to browse them quickly:
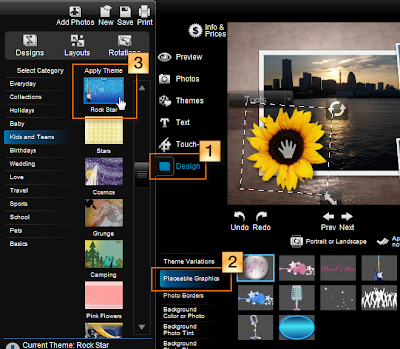
Browse placeable graphics by clicking the Design tab (1), and then the Placeable Graphics tab (2), followed by a theme button (3). Click a graphic in the grid to add it to your layout. (Click photo to enlarge.)
Read on to learn how to add your own graphics to a RocketLife project.

Adding a placeable graphic in RocketLife. Notice how the flower also includes a drop shadow to add depth.
TipEach theme in RocketLife has its own set of placeable graphics. Here's how to browse them quickly:
- Click the Design tab.
- Click the Placeable Graphics tab (below the Design tab).
- Click a theme button. The grid of graphics at the bottom of the screen will update:

Browse placeable graphics by clicking the Design tab (1), and then the Placeable Graphics tab (2), followed by a theme button (3). Click a graphic in the grid to add it to your layout. (Click photo to enlarge.)
Read on to learn how to add your own graphics to a RocketLife project.
Thursday, May 27, 2010
Cool Tip: The Whole Calendar Is Your Canvas
RocketLife software was designed to reward experimentation, and its drag-and-drop support is a great example of that. Try dragging objects around the screen to see what happens: You can create some unexpected designs.
Here's one of our favorite tips: You can customize the grid area of the calendar project as well as the top section. This is a great way to personalize a month. Simply drag a photo of each person in your family onto his or her birthday square, or add a placeable graphic such as a flower or balloon.
In this example, we dragged two graphics, a photo, and a text box onto the calendar grid. We then used the Transparency button to make the elephant graphic blend into the background. (Click the image to see the details.)
 You can customize the grid section of the calendar as well as the main photo. (Click to enlarge.)
We'll be sharing many more fun secrets like this in upcoming posts. What techniques have you discovered? Please leave a comment below, or tell the world over on our friendly Facebook page.
Subscribe to:
Comments (Atom)